
Dim Bulb Tester: A Simple Tool for Safe Electronics Troubleshooting
When working with electronics, safety is paramount. Whether you’re repairing vintage radios, amplifiers, or other electrical devices, the risk of a short circuit or component failure can be high. That’s where a dim bulb tester comes in — a simple yet powerful safety tool that helps you prevent costly mistakes. By controlling the current flow, it offers a visual indicator of potential issues, protecting both the technician and the equipment.
What Is a Dim Bulb Tester?
A dim bulb tester is a basic diagnostic device that uses an incandescent light bulb to limit current flow to the device under test. It’s essentially a current limiter that serves as an early warning system for faults. When connected between the power source and the equipment being tested, the light bulb acts as a resistor. The brightness of the bulb indicates how much current is being drawn — dim light means normal operation, while a bright glow indicates excessive current or a short circuit.
This simple concept has saved countless electronics from damage during testing or repair.
The Purpose of a Dim Bulb Tester
The dim bulb tester plays several important roles in electronics troubleshooting:
- Current Limiting: Prevents sudden surges when powering up repaired or unknown devices.
- Fault Detection: Indicates shorts or faulty wiring through bulb brightness.
- Safety: Protects sensitive components and prevents circuit breakers from tripping.
- Diagnostic Clarity: Offers a quick, visual way to check whether a circuit is functioning properly.
In short, it’s a must-have for anyone who wants to power up old or repaired devices safely.
How a Dim Bulb Tester Works
The principle behind a dim bulb tester is elegantly simple. It’s based on Ohm’s Law — when current flows through the filament of an incandescent bulb, it creates resistance, limiting the current to the connected load.
Here’s what happens in each scenario:
- Normal Circuit: If the device under test is functioning properly, only a small current passes through. The bulb glows dimly, signaling normal operation.
- Short Circuit or Fault: If there’s a short or faulty component, the current draw increases, causing the bulb to glow brightly. This brightness warns you to disconnect power immediately.
- No Load: If the device is disconnected or has an open circuit, the bulb remains off.
This simple light-based feedback allows for quick diagnosis without expensive equipment.
Building Your Own Dim Bulb Tester
One of the best things about a dim bulb tester is that it’s easy and inexpensive to build. Here’s a general overview of what you need:
Materials Required:
- A standard incandescent light bulb (60W–150W, depending on the device size).
- A bulb socket.
- An electrical outlet.
- A switch (optional).
- A project box or electrical junction box.
- Power cord and wiring.
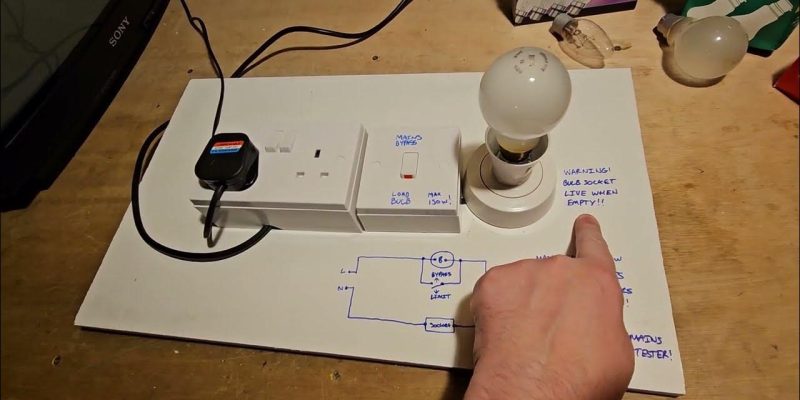
Assembly Steps:
- Mount the bulb socket and outlet into the project box.
- Wire the bulb socket in series with the outlet.
- Optionally add a switch to turn the tester on or off easily.
- Secure all connections and ensure proper insulation.
- Plug in the bulb and test the setup with a known working device.
This DIY approach makes the dim bulb tester an excellent weekend project for any electronics enthusiast.
Choosing the Right Bulb Wattage
The bulb you choose for your dim bulb tester directly affects its sensitivity and performance. Generally, a 60-watt bulb is suitable for small electronics, while higher wattage bulbs (100–150W) are used for larger appliances or amplifiers.
Guidelines:
- 60W bulb: Ideal for testing small circuits and low-power devices.
- 100W bulb: Suitable for moderate loads like amplifiers or radios.
- 150W+ bulb: Needed for high-power equipment like tube amplifiers or large motors.
Experimentation helps determine the ideal bulb size for your specific needs. Remember, using LED or CFL bulbs won’t work — only incandescent bulbs provide the resistance characteristics required for a dim bulb tester.
How to Use a Dim Bulb Tester
Using a dim bulb tester is straightforward:
- Plug your tester into the wall outlet.
- Plug the device you want to test into the tester’s outlet.
- Observe the bulb as you power on the device.
- Interpret the light:
- Dim Glow: Device is likely fine.
- Bright Light: Short or overload detected.
- No Light: No current flow — possibly an open circuit.
This visual feedback helps you proceed cautiously. If the bulb glows brightly, immediately turn off the power to prevent damage.
Common Mistakes When Using a Dim Bulb Tester
Even though a dim bulb tester is simple, a few common mistakes can lead to false readings or even damage:
- Using LED or CFL bulbs: These modern bulbs don’t work because they lack resistive filaments.
- Incorrect Wiring: Always wire the bulb and outlet in series, not parallel.
- Ignoring Safety Precautions: Never touch exposed wires or components while the device is powered.
- Using Too High Wattage: A high-wattage bulb may allow too much current to pass, defeating the purpose.
- Not Using a Grounded Outlet: Ensure all connections are properly grounded to avoid shock risks.
Understanding these pitfalls ensures your dim bulb tester works safely and effectively.
Advantages of Using a Dim Bulb Tester
A dim bulb tester might seem like an old-fashioned tool, but its advantages are numerous:
- Prevents Equipment Damage: Detects faults before they cause harm.
- Cost-Effective: Requires inexpensive parts and zero calibration.
- Easy to Use: Ideal for beginners learning electronics.
- Immediate Feedback: The bulb provides an instant visual signal.
- Portable: Lightweight and simple to carry anywhere.
It’s one of the most valuable tools you can have for bench testing or restoring electronics.
Limitations of a Dim Bulb Tester
While the dim bulb tester is extremely useful, it’s not a complete diagnostic tool.
Here are a few limitations:
- Cannot Identify Specific Faults: It shows that a fault exists but not where.
- Limited Power Handling: Not suitable for high-current industrial devices.
- Depends on Incandescent Bulbs: With these bulbs becoming rare, sourcing replacements may be tricky.
- Not for Continuous Use: It’s a testing tool, not a permanent power supply.
Still, for general electronics troubleshooting, these limitations are minor compared to the benefits.
Applications of a Dim Bulb Tester
The dim bulb tester finds use in many areas of electronics work:
- Vintage Radio Repair: Safely powers up old circuits with unknown faults.
- Audio Amplifier Restoration: Helps prevent transformer burnouts.
- Appliance Testing: Detects shorted wiring or failed components.
- DIY Electronics Projects: Provides protection when testing prototypes.
- Educational Demonstrations: Perfect for teaching basic electrical safety concepts.
Its simplicity makes it an excellent addition to any electronics lab or hobbyist bench.
Conclusion
The dim bulb tester is proof that sometimes the simplest tools are the most effective. With just a bulb, socket, and outlet, it provides a powerful way to protect yourself and your equipment from electrical hazards. It teaches patience, observation, and respect for electricity — lessons that are as important today as they were decades ago. Whether you’re a beginner learning the basics or a seasoned technician restoring vintage gear, the dim bulb tester remains an essential tool for safe, smart electronics troubleshooting.
FAQs
1. What is a dim bulb tester used for?
A dim bulb tester limits current to safely power up and diagnose electrical devices, preventing damage from shorts or faults.
2. Can I use an LED bulb in a dim bulb tester?
No. A dim bulb tester only works with incandescent bulbs because they provide the necessary resistance to limit current flow.
3. What wattage bulb should I use?
It depends on your device. A 60W bulb is good for small electronics, while 100–150W bulbs suit larger devices or amplifiers.
4. Is a dim bulb tester safe for all electronics?
Yes, as long as you use it correctly. It’s ideal for initial testing but not for extended use or high-current appliances.
5. Why does my bulb stay bright when using the tester?
A constantly bright bulb on your dim bulb tester indicates a fault or short circuit. Turn off the power immediately and inspect your device.
Also read: Can You Take Sunscreen Spray on a Plane? TSA Rules & Travel Tips