An Arctic Biome Drawing: 10 Powerful Techniques to Master This Beautiful Scene
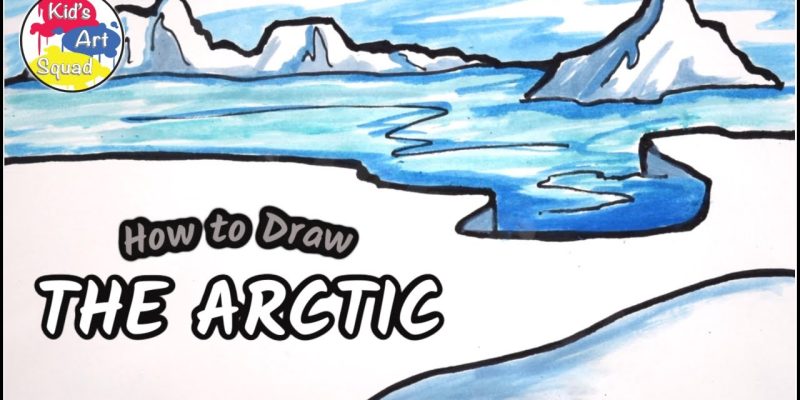
Creating An Arctic Biome Drawing is more than just sketching snow and ice. It’s about bringing the raw, untouched beauty of the polar world to life. From the sweeping white landscapes to the majestic wildlife and northern lights, each detail adds to the magic of this serene setting. Whether you’re a beginner or a seasoned artist, these techniques will help you unlock the full potential of your Arctic-themed masterpiece. Let’s explore 10 powerful techniques to elevate your drawing into a breathtaking piece of art.
Understand the Elements of An Arctic Biome Drawing
Before your pencil even hits the paper, it’s essential to understand what makes up an Arctic biome. Think frozen tundra, icy glaciers, and native species like polar bears, arctic foxes, and snowy owls. An Arctic Biome Drawing should reflect this ecosystem’s harsh beauty and stillness. Observing real-life references and studying the natural elements will help create a more realistic and immersive scene. It sets the tone and gives you a mental map before you begin sketching.
Sketch the Landscape with Broad Strokes First
Begin your Arctic Biome Drawing with broad, loose strokes to block out the major components—mountain ranges, ice fields, and snow-covered plains. This helps define spatial relationships and the flow of your composition. Use a light pencil or charcoal to prevent hard lines that are difficult to erase later. Focusing on shapes rather than details at this stage gives you flexibility to adjust proportions. Think of it as building the bones of your icy scene.
Layer Ice Textures Using Contrast and Blending
One of the most captivating aspects of An Arctic Biome Drawing is the crystalline texture of ice and snow. Achieve this effect through contrast—highlight against shadow. Use a blending stump or soft tissue to smooth graphite areas, simulating snowdrifts and glacial surfaces. Add hardness by outlining with a sharper pencil or ink for areas where light catches the ice sharply. This layered technique adds dimension and realism to otherwise flat surfaces.
Use Negative Space to Highlight Arctic Features
Negative space is your secret weapon in An Arctic Biome Drawing. By allowing some areas to remain untouched or minimally detailed, you highlight the stark, expansive emptiness of the Arctic. This minimalism creates focus and helps isolate key elements like a lone polar bear or ice floe. Use clean lines to define objects and resist the temptation to over-detail everything. The Arctic is visually powerful because of what it lacks as much as what it holds.
Incorporate Wildlife to Bring the Scene to Life
No Arctic Biome Drawing is complete without the region’s iconic wildlife. Think herds of caribou, majestic polar bears, or the curious arctic hare. These animals provide scale and inject life into your frozen scene. Use softer pencils for fur textures and sharper ones for detailing eyes, claws, and outlines. Place animals strategically to draw the viewer’s eye across the composition. Their presence turns your drawing from a static landscape into a story.
Capture Atmospheric Effects Like Fog and Light
The Arctic is famous for its surreal lighting—whether it’s the glow of the aurora borealis or the diffused light of a polar sunset. In An Arctic Biome Drawing, capturing these atmospheric effects enhances the mood dramatically. Use colored pencils or soft pastels in gentle layers to simulate northern lights. To depict fog, soften edges using smudging techniques and lighten midtones. This adds a dreamlike quality to your work, evoking the Arctic’s mystique.
Master the Use of Color in a Cold Palette
While often portrayed in shades of white and blue, An Arctic Biome Drawing benefits from a carefully curated palette. Cool colors like icy blues, soft purples, and pale grays create harmony. A touch of warm color in the sky or animal features can make key parts pop. Colored pencils, watercolor washes, or digital brushes all work, depending on your medium. Balancing color temperature keeps the drawing emotionally resonant and visually appealing.
Pay Attention to Light Sources and Shadows
Shadows and lighting are crucial for depth and realism in An Arctic Biome Drawing. In a land with low-angle sunlight or extended twilight, shadows stretch and soften. Map your light source early, whether it’s a bright sun or the glow of the aurora. Use gradation in shading to define the topography of snowbanks and the facets of ice. Shadows from animals and terrain help ground the elements and make the environment feel solid and believable.
Add Small Details for Storytelling
Details are the heart of any successful Arctic Biome Drawing. Footprints in the snow, windblown fur, or a distant igloo add narrative elements to your scene. Use fine liners or sharp pencils for these touches, ensuring they’re precise but not overpowering. Scatter these details thoughtfully throughout the drawing to guide the viewer’s eye. Every snowflake and claw mark contributes to the overall immersion and story you’re trying to tell.
Experiment with Mixed Media for Extra Impact
To elevate An Arctic Biome Drawing further, consider combining media. Ink and watercolor can be layered for contrast and dynamism. Pastels over pencil can enhance softness and light effects. Digital tools can be added later to refine or recolor. The Arctic offers many visual textures—water, ice, fur, clouds—and mixed media lets you explore them more fully. Don’t be afraid to experiment; some of the most compelling Arctic scenes emerge from bold creativity.
Conclusion
An Arctic Biome Drawing is a captivating artistic endeavor, blending the serenity of snowy plains with the quiet drama of nature’s harshest elements. Mastering techniques like texture layering, thoughtful composition, and atmospheric effects can turn a simple sketch into an evocative masterpiece. Whether you’re aiming for realism or a more stylized interpretation, the Arctic biome offers endless inspiration. Let your creativity flow like northern lights across the night sky, and let every stroke of your pencil reveal the silent poetry of the ice.
FAQs
Q1. What materials are best for creating An Arctic Biome Drawing?
High-quality graphite pencils, soft pastels, blending tools, and cold-toned colored pencils are ideal. Mixed media like ink or watercolor can enhance effects.
Q2. Can beginners create an Arctic Biome Drawing?
Absolutely! Start with basic shapes and simple landscapes. Focus on learning light, shadow, and contrast, then gradually add details and wildlife.
Q3. How do I make ice and snow look realistic in my drawing?
Use high contrast, soft blending, and pay attention to light reflections. Smooth gradations and hard highlights help capture the sparkle of icy surfaces.
Q4. What wildlife should I include in An Arctic Biome Drawing?
Consider adding polar bears, arctic foxes, snowy owls, seals, and reindeer. These animals reflect the Arctic ecosystem and add life to your drawing.
Q5. How can I add atmosphere to my Arctic Biome Drawing?
Use fog effects, northern lights, and careful color choices. Blending tools and light pencil shading can simulate mood and create immersive scenes.
Also read: Menya Musashi Menu – Explore Bold Ramen Flavors & Japanese Classics