
Amsterdam I amsterdam Sign: 8 Insider Secrets for the Best Photo Angles
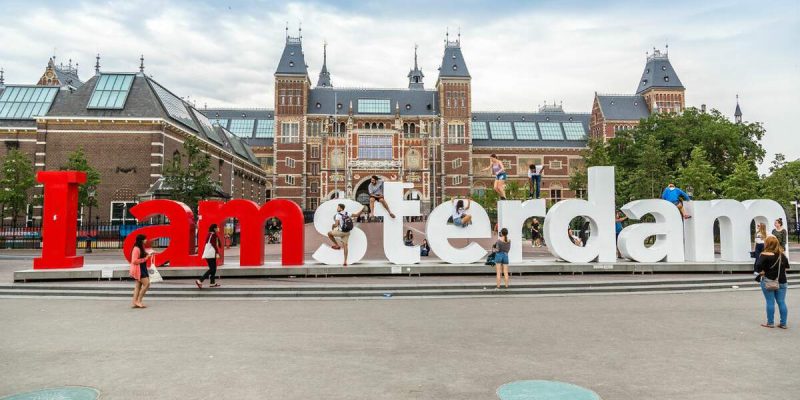
Amsterdam, a city renowned for its artistic heritage, elaborate canal system, and narrow houses with gabled facades, is also home to one of the most iconic symbols of the Netherlands: the Amsterdam I amsterdam sign. This gigantic sculpture, which originally appeared in front of the Rijksmuseum, has become a must-visit destination for tourists and locals alike. With its bold letters, it offers a perfect backdrop for memorable photographs. However, capturing the perfect shot requires a bit of strategy. In this article, we’ll reveal eight insider secrets for the best photo angles at the Amsterdam I amsterdam sign, ensuring you leave with stunning images that showcase your adventure in this vibrant city.
Timing is Everything: Visit Early Morning or Late Afternoon
The first insider tip for photographing the Amsterdam I amsterdam sign is to consider the time of day you visit. The lighting can dramatically affect the quality of your photos. Early morning or late afternoon is ideal, as the soft, golden light during these hours can add a magical touch to your pictures. Plus, arriving early or later in the day helps you avoid the throngs of tourists, allowing for a more intimate shot with the sign.
Explore Different Perspectives
Instead of just standing directly in front of the Amsterdam I amsterdam sign, try different angles to add depth and interest to your photos. Move around the sign, take shots from a low angle looking up, or capture it from the side to include the beautiful backdrop of the Rijksmuseum or the vibrant trees surrounding the area. These varied perspectives can make your photos more dynamic and visually appealing.
Incorporate Local Elements
To make your photographs truly unique, consider incorporating local elements into your shots. This could mean adding iconic Amsterdam scenery, such as bicycles, canals, or the picturesque architecture in the background. By doing so, your images will not only feature the Amsterdam I amsterdam sign but also capture the essence of the city, creating a more comprehensive narrative of your visit.
Utilize the Surrounding Space
The area around the Amsterdam I amsterdam sign is just as picturesque as the sign itself. Use the surrounding space creatively by framing your shot with nearby trees or benches. This approach can help highlight the sign while also showcasing the beautiful landscape of Amsterdam. A well-composed shot that includes surrounding elements can draw viewers in and create a sense of place.
Experiment with Depth of Field
To create visually striking images of the Amsterdam I amsterdam sign, experiment with depth of field. If you have a camera with adjustable settings, try using a wide aperture to blur the background while keeping the sign in sharp focus. This technique can emphasize the sign and make it the focal point of your composition, adding an artistic touch to your photographs.
Capture Movement
Incorporating movement into your photos can add energy and liveliness. Capture passersby, cyclists, or even the changing seasons around the Amsterdam I amsterdam sign. Consider using a slower shutter speed to create motion blur, or time your shot to capture someone jumping in front of the sign. This approach can infuse your photos with a sense of spontaneity and excitement.
Use Reflections to Your Advantage
The canals of Amsterdam provide an excellent opportunity for reflection photography. When you’re at the Amsterdam I amsterdam sign, look for angles where the sign’s reflection can be seen in the water. This adds an interesting visual layer to your images. Consider taking the photo at dusk when the lights of the city are reflected in the water for an even more enchanting effect.
Don’t Forget the Details
While capturing the big picture is essential, don’t overlook the smaller details that can make your images stand out. Zoom in on unique textures, colors, or even the shadows cast by the sign. Close-up shots of the letters themselves can create an abstract interpretation of the Amsterdam I amsterdam sign. By focusing on the details, you can showcase your artistic eye and make your photo collection even more diverse.
Plan Your Outfit
Choosing the right outfit can enhance your photos significantly. Bright colors or unique patterns can make your images pop against the backdrop of the iconic letters. Coordinate your clothing with the season and the vibe of the city. For example, warm autumn colors work beautifully in the fall, while vibrant summer attire can brighten your photos during warmer months. Planning your outfit not only adds visual interest but also contributes to the overall aesthetic of your images.
Use a Tripod for Stability
For those looking to capture the perfect shot, consider using a tripod. This is especially useful for long-exposure shots during the evening when lighting conditions are lower. A tripod allows for steadier shots, helping you achieve sharper images and allowing for creative experimentation with angles and perspectives. Whether you’re capturing the sign against the sunset or trying to photograph reflections in the water, a tripod can be an invaluable tool in your photography kit.
Conclusion
Photographing the Amsterdam I amsterdam sign is an unforgettable experience that allows you to capture the essence of this beautiful city. By following these eight insider secrets, you can elevate your photography game and take stunning images that showcase both the sign and the surrounding environment. Whether you choose to capture the sign at sunrise, incorporate local elements, or experiment with depth of field, the key is to be creative and enjoy the process. With a little planning and some innovative angles, you’ll leave Amsterdam with a collection of photos that not only highlight the iconic sign but also tell the story of your adventure in this remarkable city.
FAQs
Q1. How can I avoid crowds when photographing the sign?
Visiting during off-peak hours, such as early mornings on weekdays, can help you avoid large crowds.
Q2. What is the best time to visit the Amsterdam I amsterdam sign for photos?
The best times for photography are early morning or late afternoon when the lighting is soft and the crowds are smaller.
Q3. Can I climb on the Amsterdam I amsterdam sign?
Climbing on the sign is generally discouraged for safety reasons. However, you can take photos in front of and around the sign.
Q4. How can I avoid crowds when photographing the sign?
Visiting during off-peak hours, such as early mornings on weekdays, can help you avoid large crowds.
Q5. Are there any restrictions on photography near the Amsterdam I amsterdam sign?
There are typically no strict restrictions on photography at the Amsterdam I amsterdam sign, but be respectful of other visitors and follow any guidelines provided by local authorities.
Also read: Cheeses from Holland: 10 Unmissable Choices for Your Next Cheese Platter