Mary Berry Oat Biscuits: 10 Foolproof Techniques for Ultimate Crispy Perfection
When it comes to baking, few names are as iconic as Mary Berry. Renowned for her impeccable skills and comforting recipes, Mary Berry has inspired countless home bakers with her delectable treats. Among her many culinary creations, Mary Berry oat biscuits stand out as a quintessential example of simple yet divine baking. These biscuits are the perfect blend of crunch and flavor, ideal for any occasion. In this article, we will delve into ten foolproof techniques to ensure your Mary Berry oat treats achieve ultimate crispy perfection. Whether you’re a seasoned baker or a novice, these tips will help you master the art of creating these delightful treats.
Choose the Right Oats for Mary Berry Oat Biscuits
The foundation of any great biscuit lies in its ingredients, and for Mary Berry oat biscuits, the choice of oats is crucial. Use rolled oats for a traditional, chewy texture. These oats are steamed and flattened, providing the ideal consistency for biscuits. Avoid quick oats, as they tend to be finer and may lead to a less satisfying crunch. For the ultimate crispy Mary Berry oat treats, opt for old-fashioned rolled oats. They give your biscuits the perfect texture and help them maintain their shape during baking.
Mary berry oat biscuits: Perfecting the Biscuit Dough Consistency
Achieving the right consistency in your dough is key to perfect Mary Berry oat biscuits. The dough should be thick but not dry. If it’s too wet, your biscuits might spread too much and lose their crispiness. On the other hand, if it’s too dry, the biscuits may turn out crumbly. To ensure the right consistency, gradually add flour to your oat mixture until it forms a dough that is easy to handle but not sticky. This balance is essential for the ultimate crispy Mary Berry oat treats.
Mary berry oat biscuits: Proper Mixing Techniques for Even Distribution
When making Mary Berry oat biscuits, how you mix your ingredients matters. Over-mixing can lead to tough biscuits, while under-mixing can result in uneven distribution of ingredients. Mix your oats, flour, and other dry ingredients together first, then add your wet ingredients. Gently fold the mixture until just combined. This method ensures that all components are evenly distributed, which is crucial for achieving the consistent texture and flavor in your oat treats.
The Role of Chilling the Dough
Chilling the dough is a simple yet effective technique for achieving perfect Mary Berry oat biscuits. After mixing your dough, wrap it in plastic wrap and refrigerate for at least 30 minutes. This step allows the fats to solidify, which helps the biscuits maintain their shape during baking. Chilling also improves the texture, making the biscuits more crisp and less likely to spread. For the best results, don’t skip this step in your quest for the ultimate crispy Mary Berry oat treats.
Choosing the Right Baking Temperature
Baking temperature is a critical factor in achieving crispy oat cookies. Preheat your oven to 350°F (175°C). This temperature allows the biscuits to cook evenly and develop a golden-brown color. Baking at too high a temperature may cause the edges to burn before the center is fully cooked, while too low a temperature can result in a chewy rather than crispy texture. For oat treats, a consistent 350°F is ideal for getting that perfect crunch.
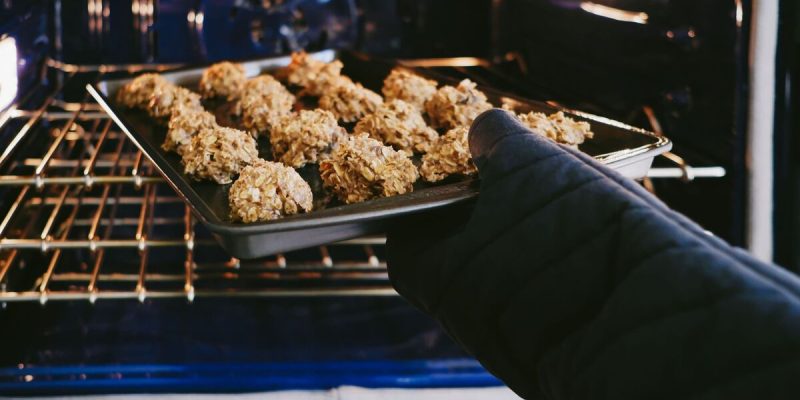
The Importance of Evenly Spacing Your Biscuits
Proper spacing on the baking sheet is essential for achieving crispy Mary Berry oat biscuits. Place each biscuit about 2 inches apart to ensure they have enough room to expand without merging into each other. Crowding the baking sheet can lead to uneven baking and soggy spots. Use a baking sheet lined with parchment paper to prevent sticking and ensure even heat distribution. With the right spacing and preparation, your Mary Berry oat treats will bake up perfectly crisp.
Using Parchment Paper for Optimal Results
To achieve the best texture in your Mary Berry oat biscuits, consider using parchment paper on your baking sheets. Parchment paper provides a non-stick surface that helps prevent the biscuits from sticking and ensures they bake evenly. It also aids in easy cleanup, making your baking experience more enjoyable. For an extra touch of perfection, lightly grease the parchment paper or use a silicone baking mat to further enhance the crispiness of your Mary Berry oat cookies.
Knowing When Your Biscuits Are Done
Determining the perfect baking time is crucial for crispy oat treats. Bake your biscuits for 12-15 minutes, or until they are golden brown and firm to the touch. Avoid opening the oven door too frequently, as this can cause temperature fluctuations and affect the baking process. To test for doneness, gently tap the center of a biscuit; it should feel firm and have a slight crunch. With practice, you’ll be able to gauge the ideal baking time for your oat cookies.
Cooling Your Biscuits Properly
Allowing your Mary Berry oat biscuits to cool properly is essential for achieving the desired texture. After removing them from the oven, transfer the biscuits to a wire rack to cool completely. This helps prevent the bottoms from becoming soggy and allows air to circulate around the biscuits, preserving their crispiness. Avoid stacking the biscuits until they are fully cooled, as this can lead to condensation and affect their texture. Proper cooling is the final step in ensuring your oat cookies are perfectly crispy.
Storing Your Biscuits for Maximum Freshness
To maintain the crispy texture of your oat treats, proper storage is key. Store your cooled biscuits in an airtight container at room temperature. For longer shelf life, consider placing a piece of parchment paper or a slice of bread in the container to help absorb any moisture. Avoid refrigerating the biscuits, as this can make them lose their crispiness. With the right storage techniques, your Mary Berry oat cookies will stay fresh and delicious for days.
Conclusion
Mary Berry oat biscuits are a testament to the art of simple yet elegant baking. By following these ten foolproof techniques, you can achieve ultimate crispy perfection in every batch. From selecting the right oats to perfecting your mixing and baking methods, each step plays a crucial role in creating these delightful treats. Whether you’re a seasoned baker or just starting out, these tips will help you create Mary Berry oat cookies that are sure to impress. Enjoy the process and savor the results of your perfectly crisp biscuits!
FAQs
Q1. What type of oats should I use for Mary Berry oat biscuits?
For oat cookies, use old-fashioned rolled oats. They provide the best texture and crunch. Avoid quick oats as they can lead to a less desirable consistency.
Q2. How long should I chill the dough before baking?
Chill the dough for at least 30 minutes. This helps the dough firm up, maintain its shape during baking, and achieve a crispier texture.
Q3. What temperature should I set my oven to for baking oat biscuits?
Preheat your oven to 350°F (175°C). This temperature allows the biscuits to cook evenly and develop a golden-brown color and crispy texture.
Q4. How can I tell when my oat biscuits are done baking?
Oat biscuits are done when they are golden brown and firm to the touch. They should have a slight crunch when tapped. Avoid opening the oven door frequently to maintain a consistent temperature.
Q5. What is the best way to store oat biscuits to keep them crispy?
Store cooked oat biscuits in an airtight container at room temperature. To keep them crispy, avoid refrigerating them and consider adding a slice of bread or a piece of parchment paper to absorb moisture if necessary.
Also read: Pistachio Lindor: 10 Delightful Recipes to Elevate Your Chocolate Experience